日志系统设计
目录
- 概述
- 系统指标
- 数据库设计
- 页面设计
- 系统设计
- 系统的整体设计与构思
- 模块设定与模块功能
- 各功能的实现
- 查询日志
- API接口
- 生成日志
- 扩展
- 新增一个页面
- 测试
- 部署
- 结语
概述
本系统采用REACT + NODE + MONGO技术,实现前后端分离。系统化的记录日志并转存大数据。使得日志系统得以与应用系统分离开来并集中管理,减少原本系统的压力,实现更高效率地完成原本系统的功能。
系统指标
网络环境:内网 服务系系统:Linux version 3.10.0-514.10.2.el7.x86_64 CPU: Intel(R) Core(TM) i5-6400 CPU@2.70GHz 内存:8G
API: /api/log/create
| 并发量 | 时间(s) | Error(%) | 吞吐量(transaction/sec) | 备注 |
|---|---|---|---|---|
| 10000 | 60 | 0 | 804 | |
| 15000 | 60 | 0 | 1229 | |
| 16000 | 60 | 0 | 1251 | |
| 17000 | 60 | 0 | 1282 | |
| 17981 | 60 | 0.01 | 819 | |
| 18000 | 60 | 0.37 | 728 | |
| 20000 | 60 | 1.7 | 746 |
TPS: 1200 transaction/sec
ps:详情见下测试
数据库设计
表说明:日志表 索引:_id(主键),sSystemTime(数据创建时间,有效期30天)
| 字段 | 类型 | 说明 | 备注 |
|---|---|---|---|
| _id | ObjectId | 主键 | |
| sCreateName | String | 创建人 | |
| sMethod | String | 方法 | |
| sIp | String | Ip | |
| sUrl | String | url | |
| sCreateTime | String | 发起请求的时间 | YYYY-MM-DD HH:mm:ss |
| sSystemTime | ISODate | 创建数据的时间 | |
| sSystem | String | 系统 | 枚举值:MSO, CRM, DS |
| sLevel | String | 等级 | 枚举值:error, warn, info |
| sMark | String | 标记 | |
| oOption | Object | 任意内容 | Json格式 |
日志有效期30天(超过30天日志mongo自动删除, 须长期保存的具体日志已转存至大数据) 语句:db.logs. ensureIndex ({sSystemTime: 1}, { expireAfterSeconds: 2592000}) ps: 如果更改有效时间(如30天改为7天), 应对logs表索引的过期时间进行更新,并同步更新本文档
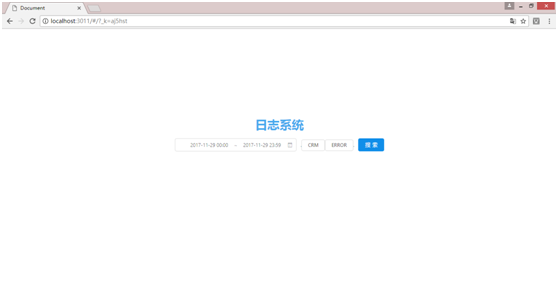
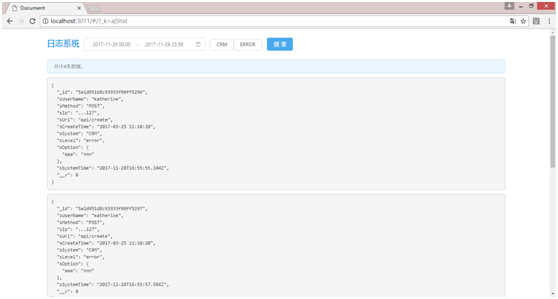
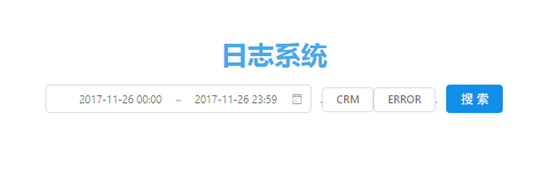
页面设计
主页:
结果页:
系统设计
系统整体设计与构思
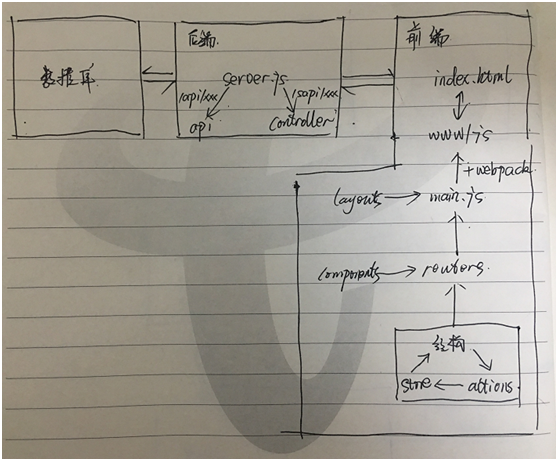 文件结构:
文件结构:
系统入口文件server,通过
app.get('/', function(req, res) {
    res.sendFile(path.join(__dirname, 'index.html'));
})
将页面文件index.html发送到前端。
index.html引入js文件 www/js,该文件由前端入口文件main.js通过webpack打包,main.js内含前端路由,并可以在次引入布局文件layouts,路由引入页面routes,页面中可以引入可复用的组件components,前端页面由flux框架组合而成。flux框架分为结构、actions、store组成。
最基础结构文件 app/routes/aaa/Aaa.js
import React, { Component } from 'react'

import AaaActions from './AaaActions'
import AaaStore from './AaaStore'

class Aaa extends Component {
    constructor(props) {
        super(props);
        this.state = AaaStore.getState();
        this.onChange = this.onChange.bind(this);
    }
    componentDidMount() {
        AaaStore.listen(this.onChange);
    }
    componentWillUnmount() {
        AaaStore.unlisten(this.onChange);
    }
    onChange(state) {
        this.setState(state);
    }
    render() {
        return (
            <div>
                <p>这是一个例子</p>
                {this.state.name}
            </div>
        )
    }
}

export default Aaa
最基础actions文件 为该页面新增action文件,发送ajax请求等可以在action里做: app/routes/aaa/AaaActions.js
import alt from '../../alt';

class AaaActions
{
    constructor() {
        this.generateActions(
        );
    }
}

export default alt.createActions(AaaActions);
最基础store文件 为该页面增加store文件,页面使用的参数都在store文件中初始化及集中管理 app/routes/aaa/AaaStore.js
import alt from '../../alt'
import AaaActions from './AaaActions'

class AaaStore {
    constructor() {
      this.bindActions(AaaActions);
      this.name = 'katherine';
    }
}

export default alt.createStore(AaaStore);
前段发送的http请求,通过server.js的路由到controllers文件或api文件
/**
 * 系统自有后端 sapi
 */
app.all('/sapi/:controller/:measure', function(req, res, next) {
    var file = require(`./server/controllers/${req.params.controller}`);
    file = new file();
    return file[req.params.measure](req, res, next);
});

/**
 * API接口
 */
app.post('/api/:filename/:measure', function(req, res, next) {
    if(fs.existsSync(`./server/API/${req.params.filename}.js`)) {
        var file = require(`./server/API/${req.params.filename}`);
        file = new file();
        return file['post' + _.capitalize(req.params.measure)](req, res, next);
    }

    return res.status(500).send('url is incorrect')
})
到达控制层后,控制层可以通过引用lib/common.js文件使用各种公用的方法,其中比较重要的是连接数据库,数据表的方法。
// 连接数据库和表
this.modelLoader = function(connectionName, dbName) {
    if(!connectionName || connectionName == '') {
        return
    }

    let db = 'log'
    if(dbName) {
        db = dbName;
    }
    mongoose.connect(`mongodb://localhost/${db}`);

    var schema = require(`../schemas/${connectionName}.js`);
    var model = mongoose.model(connectionName, schema);

    return model;
}
使用:
var common = require('common');
var logM = common.helper.modelLoader('log');
logM.find({}, function(err, result) {
    // TODO……
})
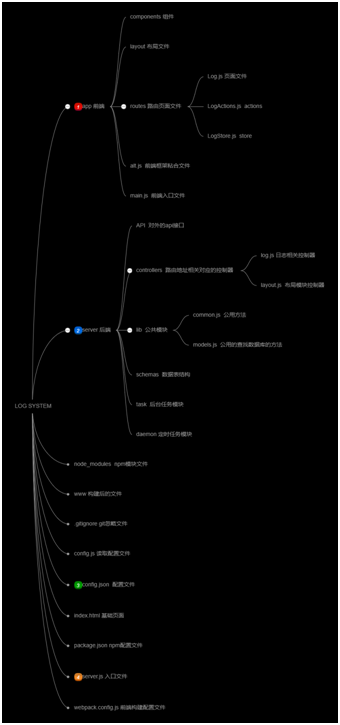
模块设定与模块功能
一、conrollers 本模块用于存放对应前端路由对应的控制层接口 基础文件结构为:
var common = require('../lib/common')

class Aaa {
    fetchMenu(req, res, next) {
        var logM = common.helper.modelLoader('log');
        logM.find({}, function(err, result) {
            return res.status(200).send('hello world');
        })
       }

    nextFuction(req, res, next) {
        // TODO……
    }
}

module.exports = Aaa
如url地址为:/sapi/log/create,则请求会走到server/controllers/log.js下的create(req, res, next) {}方法。
二、API 本模块用于API接口对应的方法 基础文件结构为:
var common = require('../lib/common')
class Log {
    postCreate(req, res, next) {
            return res.status(200).send({code: 200, msg: 'success'});
        });
    }
}

module.exports = Log
如url地址为:/api/log/create,且方法为POST,则请求会走到server/API/log.js下的create(req, res, next) {}方法。
三、lib 公共模块:common 分为两部分,一部分将安装的npm包或封装的方法模块,通过common文件转出,使得任何一个文件只要引用common就能够时候所有的npm包或封装的方法模块,而不需要额外再require,特别是对于一些或封装的方法模块,能够在一个文件集中管理,使得后来者维护系统时可以使用已有的方法而不需要找不到或者重复封装。 另一个是helper下的方法,一些常用的方法函数的封装,比如说modelLoader方法就是使用数据库是非常常用的一个方法。
鉴权模块:permission 请求通过server.js时,如过是/api/开头的请求,则需要鉴权 获取配置文件config.json中的system:["CRM", "MSO", "DS"],如果请求的req.body.sSystem的值为以上数组的任何一个,则鉴权成功,程序继续往下走,如果没有则失败返回“没有权限”
四、schemas 本模块用于定于数据表的数据结构 例如:logs表
var mongoose = require('mongoose')

var LogSchema = new mongoose.Schema({
    sUserName : String,
    sMethod : String,
    sIp : String,
    sUrl : String,
    sSystem: {type: String, enum: ["MSO", "CRM", "DS"]},
    sPart: String,
    sLevel: {type: String, enum: ["error", "warn", "info"]},
    sMark: String,
    sCreateTime : String,
    sSystemTime: String,
    oOption : Object
})

module.exports = LogSchema
五、configure 本模块用于收集需要定义的配置,方便修改相关配置时方便查找及修改。
各功能的实现
一、查询日志
 点击查询按钮,
如果日期在三天以内则搜到actions,如果超过3天则返回提示 app/routes/log/Log.js -> handleSubmit() {}
向后端发起请求 app/routes/log/LogActions.js -> fetchLogs() {}
查询logs表并返回符合筛选条件(日期范围,系统,等级)的数据 server/controllers/log.js -> list(req, res, next) {}
将数据传给store app/routes/log/LogActions.js -> fetchLogs() {}
store将数据处理,使得app/routes/log/Log.js文件可以通过this.state.xxx使用 app/routes/log/LogStore.js -> onFetchLogsSuccess() {}
API
一、创建日志
URL: /api/log/create 方法:POST 入参:
| 字段 | 类型 | 必填 | 说明 | 备注 |
|---|---|---|---|---|
| sCreateName | String | 创建人 | ||
| sMethod | String | 方法 | ||
| sIp | String | Ip | ||
| sUrl | String | url | ||
| sCreateTime | String | 发起请求的时间 | YYYY-MM-DD HH:mm:ss | |
| sSystem | String | yes | 系统 | 枚举值:MSO, CRM, DS |
| sLevel | String | yes | 等级 | 枚举值:error, warn, info |
| sMark | String | 标记 | ||
| oOption | Object | 任意内容 | Json格式 |
返回: {code:200, msg: "xxxxxx", data: {}} 可能的返回值: 200: 成功 450:缺少参数 452:不合法的参数
扩展
一、新增一个页面
app/routes/aaa/Aaa.js
import React, { Component } from 'react'

import AaaActions from './AaaActions'
import AaaStore from './AaaStore'

class Aaa extends Component {
    constructor(props) {
        super(props);
        this.state = AaaStore.getState();
        this.onChange = this.onChange.bind(this);
    }
    componentDidMount() {
        AaaStore.listen(this.onChange);
    }
    componentWillUnmount() {
        AaaStore.unlisten(this.onChange);
    }
    onChange(state) {
        this.setState(state);
    }
    render() {
        return (
            <div>
                <p>这是一个例子</p>
                {this.state.name}
            </div>
        )
    }
}

export default Aaa
为该页面新增action文件,发送ajax请求等可以在action里做: app/routes/aaa/AaaActions.js
import alt from '../../alt';

class AaaActions
{
    constructor() {
        this.generateActions(
        );
    }
}

export default alt.createActions(AaaActions);
为该页面增加store文件,页面使用的参数都在store文件中初始化及集中管理 app/routes/aaa/AaaStore.js
import alt from '../../alt'
import AaaActions from './AaaActions'

class AaaStore {
    constructor() {
      this.bindActions(AaaActions);
      this.name = 'katherine';
    }
}

export default alt.createStore(AaaStore);
当页面中需要使用到纯函数(不含ajax请求或者setTimeout等不定向函数)时,则: app/routes/aaa/Aaa.js
componentDidMount() {
        AaaStore.listen(this.onChange);

        AaaActions.changeName('lucy');
    }

app/routes/aaa/AaaActions.js
import alt from '../../alt';

class AaaActions
{
    constructor() {
        this.generateActions(
            'changeName'
        );
    }
}

export default alt.createActions(AaaActions);
app/routes/aaa/AaaStore.js(注意:只能传一个参数,如果要传一个以上的参数,请使用json)
import alt from '../../alt'
import AaaActions from './AaaActions'

class AaaStore {
    constructor() {
      this.bindActions(AaaActions);
      this.name = 'katherine';
    }

    onChangeName(name) {
        this.name = name;
    }
}

export default alt.createStore(AaaStore);
当页面中使用到ajax之类的函数时 app/routes/aaa/Aaa.js
    componentDidMount() {
        AaaStore.listen(this.onChange);

        AaaActions.changeName('lucy');

        AaaActions.sendAjax();
    }
app/routes/aaa/AaaActions.js(在action中发ajax请求,然后再将结果发送到store)
import alt from '../../alt';

class AaaActions
{
    constructor() {
        this.generateActions(
            'changeName',
            'ajaxToStore'
        );
    }

    sendAjax() {
        $.ajax({
            method: 'GET',
            url: 'api/aaa/list'
        }).done(data => {
            this.actions.ajaxToStore(data)
        })
    }
}

export default alt.createActions(AaaActions);
app/routes/aaa/AaaStore.js(在再store中提供页面使用)
import alt from '../../alt'
import AaaActions from './AaaActions'

class AaaStore {
    constructor() {
      this.bindActions(AaaActions);
      this.name = 'katherine';
      this.data = {};
    }

    onChangeName(name) {
        this.name = name;
    }

    onAjaxToStore(data) {
        this.data = data;
    }
}

export default alt.createStore(AaaStore);
刚才发送的那个ajax的url url: '/api/aaa/list'
接收它的后端文件,url的第二项对应为controllers下的文件名,第三项对应为文件下的方法名。如果是直接对应请求的方法,方法名的参数应为(req, res, next) server/controllers/aaa.js
var common = require('../lib/common')
var co = require('co')

class Aaa {
    list(req, res, next) {
        return res.status(200).send(result)
    }
}

module.exports = Aaa
方法中查询数据库时,可是使用封装好的查询数据库的方法 common.helper.modelLoader('crm_error', 'log') 第一个参数为数据库表名,第二个参数为数据库名。如果库名省略,则连接到默认(log)库
var common = require('../lib/common')
var co = require('co')

class Aaa {
    list(req, res, next) {
        var aaaM = common.helper.modelLoader('crm_error', 'log');

        aaaM.find({}, function(err, result) {
            return res.status(200).send(result)
        })
    }
}

module.exports = Aaa
测试
网络环境:内网 服务器系统:Linux version 3.10.0-514.10.2.el7.x86_64 CPU: Intel(R) Core(TM) i5-6400 CPU@2.70GHz 内存:8G
API: /api/log/create 方法:POST 参数:{}
| 并发量 | 时间(s) | Error(%) | 吞吐量(transaction/sec) | 备注 |
|---|---|---|---|---|
| 10000 | 60 | 0 | 804 | |
| 15000 | 60 | 0 | 1229 | |
| 16000 | 60 | 0 | 1251 | |
| 17000 | 60 | 0 | 1282 | |
| 17981 | 60 | 0.01 | 819 | |
| 18000 | 60 | 0.37 | 728 | |
| 20000 | 60 | 1.7 | 746 |
TPS: 1200 transaction/sec
以上系统受理并发请求到超时返回错误得出TPS约在1200 transaction/sec左右。继续加大压力,测试当系统错误率到达5%以上的压力情况。以下:
| 并发量 | 时间(s) | Error(%) | 吞吐量(transaction/sec) | 备注 |
|---|---|---|---|---|
| 35000 | 120 | 4.11 | 1084 | |
| 38000 | 120 | 5.25 | 1084 | |
| 39000 | 120 | 5.93 | 1078 | |
| 40000 | 120 | 7.38 | 1011 |
超过十万并发时,超时错误率急速上升,但服务器、mongo、node依旧没有out of memery,一段时间(2~10分钟)过后,依旧可以正常接收日志。
注: 压力测试情况由洪艳萍完成提供,特此感谢。
部署
一、安装node -v6.1.2 二、安装mongo -v1.3.0 三、全局安装webpack、pm2
npm install webapck -g
npm install pm2 -g
四、拉取代码
git clone git@git.xxxxxxx
五、安装npm包 应用根目录下
npm install
六、根据环境填写合理的配置文件config.json(如果没什么特别的其实可以保持原样不动) 七、构建前端代码
webpack
八、启动应用
pm2 start ./server.js --name logSystem


其他命令:

pm2 list   //检查应用运行状态
pm2 restart all  //全部重启
pm2 stop all   //全部停止
pm2 delete all  //全部删除
pm2 log logSystem --lines 100   //运行日志
更新部署: 一、拉取代码 应用根目录下
git pull origin master
二、构建前端代码
webpack
三、重启应用
pm2 restart logSystem
结语
日志系统到这里就告一段落了。